How to Run LinkedIn Conversation Ads for Lead Generation — The Complete Guide (Plus, How to Automate & Outsource Follow-Up)
How to Run LinkedIn Conversation Ads for Lead Generation — The Complete Guide (Plus, How to Automate & Outsource Follow-Up)

Nearly half of the world is on social media, including your future clients. And if you want to connect with them, you should be, too.
LinkedIn is one of the best social media platforms your business could use to find those clients. With over 700 million work-minded members, your business is bound to get a bite if you cast a line. However, there is a catch (no pun intended): Your business will compete with over 55 million other companies hoping to attract leads on LinkedIn. So to make it easy for leads to discover your business, you should consider creating and running ads.
LinkedIn has various advertising options, but conversation ads have proven the most effective for my own lead generation efforts, and that’s what I’m focusing on here. These ads allow you to message your target audience, capture their information in a lead gen form, and direct them to a resource or booking link (to secure a sales demo or consultation).
In this article, I provide a step-by-step breakdown of how you can launch highly effective LinkedIn conversation ads at a relatively low cost. I also share how to implement these ads alongside outsourced sales teams, like Smith.ai, and automation software, like Zapier, to even more effectively engage and convert LinkedIn leads driven by these campaigns.
Having spent nearly a decade in paid media and most of my career in digital marketing agencies, I’m an expert in lead acquisition campaigns. I specialize in demand generation and lead generation, with a heavy focus on paid social media ads across various platforms. LinkedIn conversation ads, along with Facebook lead-gen ads, are significant growth drivers for us at Smith.ai. These can work for your business, too. Let’s get started, so I can show you how!
The complete guide
I’ll go over everything you need to know about running LinkedIn conversation ads for lead generation, which I’ve broken down into the following outline:
1. Conversation Ads 101
- What are LinkedIn conversation ads?
- Why choose LinkedIn conversation ads?
- Drawbacks of LinkedIn conversation ads
2. Creating LinkedIn Conversation Ads
- Creating your LinkedIn account
- Building a lead-generation campaign
- Creating conversation ads
3. Setting up a Zapier automation
- Signing up for a Zapier account
- Connecting your apps to Zapier
- Setting up the Zap trigger
- Setting up the Zap action
4. Creating a Zap to outsource to Smith.ai
- (EASY) Create a Zap to connect LinkedIn with Smith.ai
- (ADVANCED) Creating a Zap to connect LinkedIn with Smith.ai, Salesforce, and Slack
LinkedIn Conversation Ads 101
What are conversation ads?
As their name implies, conversation ads allow you to start conversations with professionals and business decision-makers via LinkedIn Messaging on desktop and mobile devices. They’re a form of native advertising displayed to LinkedIn members through Messaging based on the target audience created by the advertiser. – via LinkedIn
Conversation ads are billed on a “per-send” basis, so the higher number of inboxes you can reach, the better chance you have of your message being read and interacted with.
Why LinkedIn conversation ads?
There are two main reasons to use LinkedIn conversation ads:
- Level of targeting for B2B advertisers:
As I’ll discuss later in the blog, the level of targeting available on LinkedIn for B2B advertisers is unmatched. From job title to company to company revenue, they have it all. Even better — it tends to be very accurate and up to date — as people generally keep their LinkedIn profiles as current as possible.
- Authenticity:
Traditional advertising is typically considered one-way communication — the brand communicates with the target audience. Using LinkedIn conversation ads, you can give users the impression that you are communicating back to them based on their responses. Although the entire process is automated, and you will not actually be hands-on communicating directly, the user experience is such that they will feel they are having a conversation with a brand. Similar to email, you can personalize based on the user’s name, job title, etc., so that the user feels that you are specifically communicating with them, rather than simply seeing a passive ad in their feed while scrolling.
Drawbacks of conversation ads
While there are many pros of LinkedIn conversation ads, there are also some drawbacks that you should be aware of before you launch your first campaign.
- Speed to conversion
LinkedIn conversation ads are effective, but they’re never going to give you instant gratification. In my experience, it can take anywhere from days to weeks to start seeing real results from LinkedIn conversation ads, due to the fact that not everyone checks their LinkedIn mail consistently. You may see conversions come in weeks after you begin sending messages. If you’re looking for more of a quick win, Facebook ads are the better choice, given that you can start seeing results hours after launching a campaign.
- Platform Ease of Use
As a whole, LinkedIn’s platform is substantially less user-friendly and advanced compared to Facebook. The interface can be clunky and confusing at times and the reporting capabilities are limited.
Creating LinkedIn Conversation Ads
Creating a LinkedIn ad account
Before creating your LinkedIn ads, you need to create a LinkedIn ad account, a simple process that only takes a few minutes. Here is an excellent resource on setting up your first ad account.
Build your campaign
There are a few steps you’ll need to take to build a successful LinkedIn ad campaign:
Step #1: Create a new campaign for conversation ads
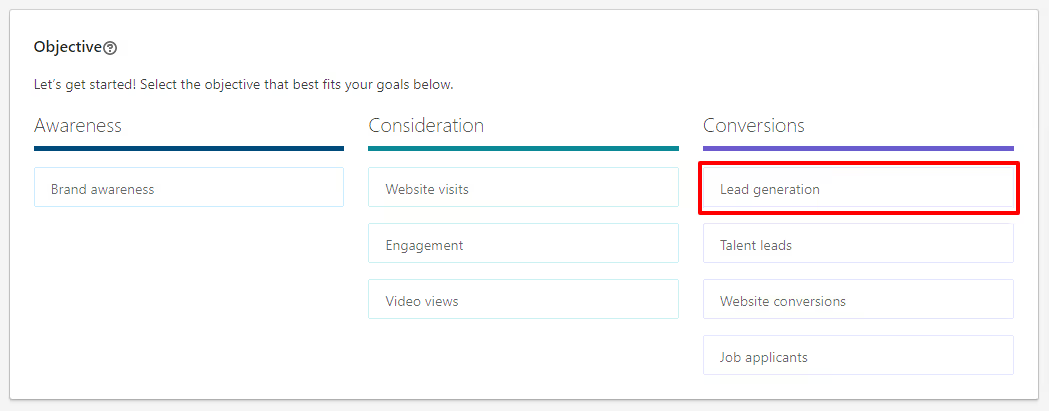
To begin creating your conversation ads campaign, click “Create → Campaign” from the home menu and select “Lead generation” as your objective.

Step #2: Build your audience
Next, it’s time to build your audience. Again, LinkedIn shines as a platform to reach B2B audiences, so make sure to take advantage of all of the business-specific targeting at your disposal.
Finding the correct combination of targeting segments requires a lot of trial and error, but to begin, try to build your ideal customer profile and then fill in the blanks based on what you already know about who you’re trying to reach.
📍 Smith.ai Example
At Smith.ai, our target audience is comprised of high-level decision-makers at small to medium-sized companies. In my experience, the most relevant targeting categories that I continued coming back to were the following:
- Job titles / Job seniority - target based on current job title/target based on level of seniority (i.e. manager, director, VP)
- Years of experience - target based on the cumulative experience listed within their profile
- Company industries - target based on umbrella industry to cast a wider net within a specific vertical (i.e. legal, healthcare, finance)
- Company size - target based on the size of the organization that the user works for
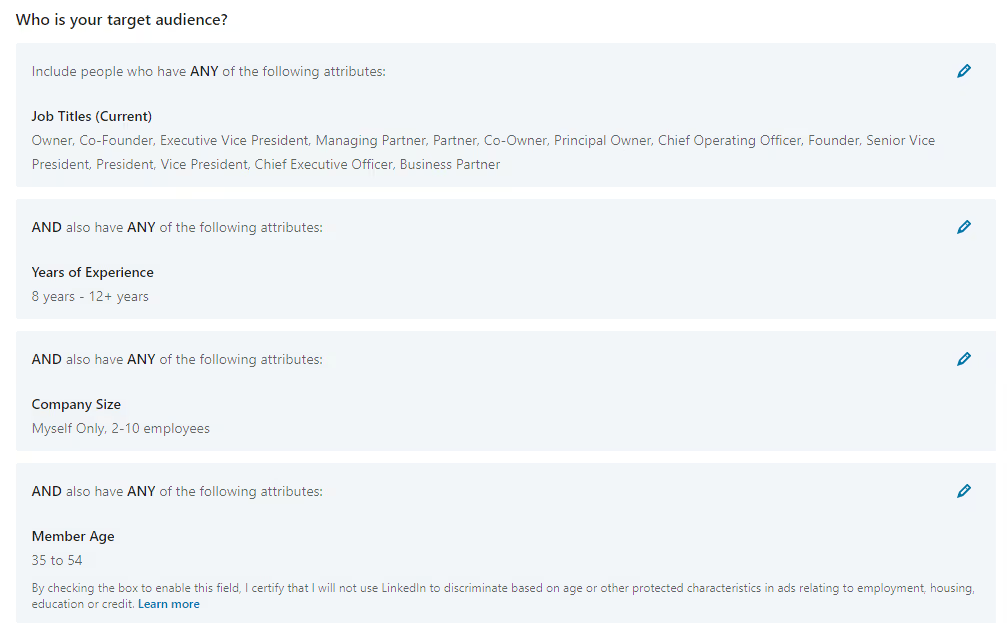
LinkedIn also offers the ability to target much more granularly, getting down to targeting users who work for a specific company or companies in certain categories, such as “Fortune 100 Fast Growing Companies.” However, I tend to find that targeting this granularly on LinkedIn doesn’t necessarily yield the best results. Instead, I have found much larger success when casting a wider but still targeted net.
Step #3: Ad format & budget
The next three steps are pretty straightforward.
Choose your ad format as “Conversation ad,” and the placement is automatically selected for you. Next, select how much you would like to spend and when you would like your ads to run.
Step #4: Bidding
You will have to select how much you are willing to bid per direct message send to a LinkedIn user that you are targeting.
There is no “correct” answer here, as every bid recommendation will come based on your target audience. I have found that our sweet spot for bidding tends to be around $0.40. Remember, the more users that you are able to reach through a higher number of sends, the better chance that you have at a larger number of conversions.
Step #5: Conversion tracking (optional)
Lastly, you have the option to measure the actions the lead takes on your website after engaging with your ad. Keep in mind that this step is optional; however, learning more about your leads’ movements after interacting with an ad never hurts.
Creating Conversation Ads
Once you’ve built your campaign, you can finally begin creating your conversation ads by following the steps below:
Step #1: Click “Create new ad”
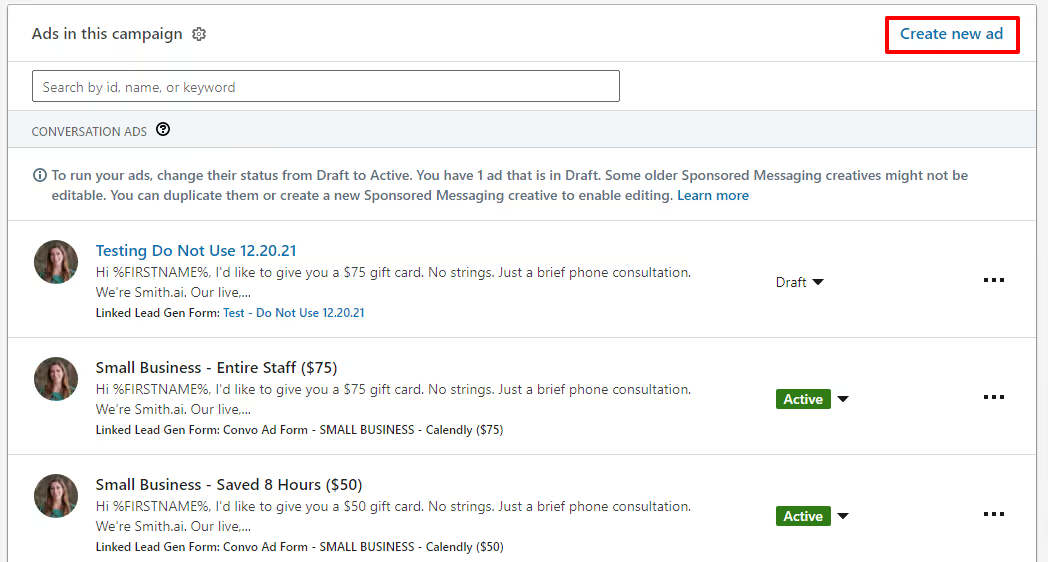
Go to “Set Up Ads” and press the “Create new ad” button in the top right corner.
Step #2: Choose your sender
Before creating a conversation ad, you need to decide from whom the message will be sent.
Note — you cannot send a conversation ad from a LinkedIn company page (i.e. the brand itself), It has to come from someone within the organization.
When deciding who is going to be the sender, consider what the theme of the message that you’re sending will be. If the message centers around signing up for a demo, it might be better off coming from someone in your sales organization. If it’s something a bit higher level, it might make more sense to have someone from the marketing department send it. There is no right or wrong answer here, as every campaign is different.
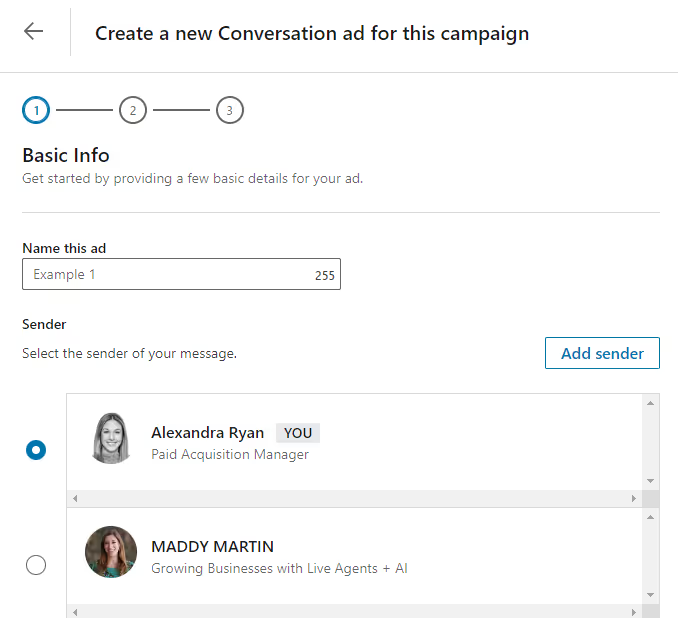
To add a new approved sender, click “Add Sender” as seen in the screenshot above. You will have to be connected with a person on LinkedIn to send a request.
When you receive a request to be a sender on a LinkedIn Sponsored Messaging campaign, you can approve or reject this request by following the link provided in the email.
Step #3: Create your form
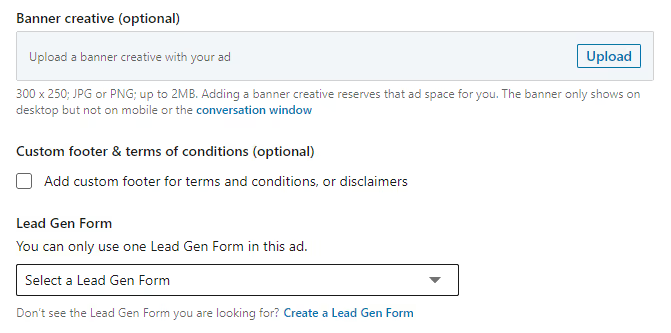
Because this is a lead generation campaign, you’ll need to create a form to be used. After you select your sponsored sender, at the bottom of the page, there will be a prompt that says “Lead Gen Form.” From there, you can either select a form you’ve already created or follow the prompt that says “Create a Lead Gen Form.”
⭐ Pro Tips
Most of the form details are very self-explanatory. Here are a few pro tips that I’ve learned from running a handful of campaigns:
- Don’t add too many questions
Although LinkedIn lets you add up to 10 questions to your form, I don’t recommend it. Adding too many questions could turn away potential leads.
- Always ask for a phone number
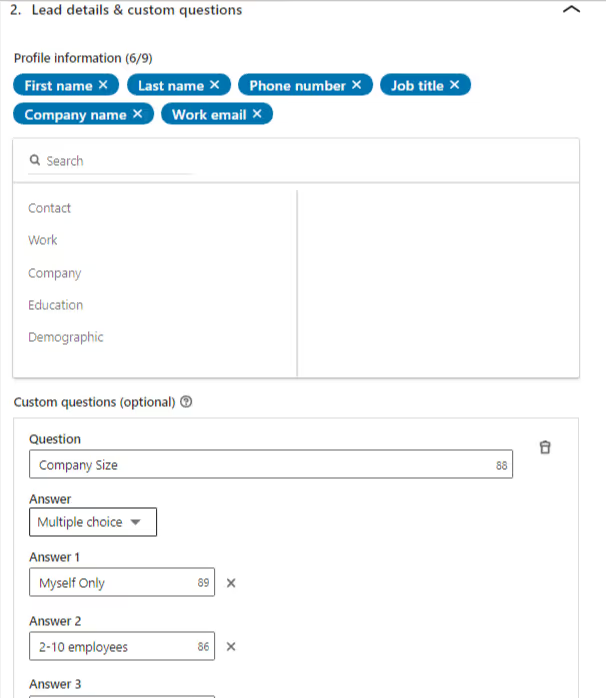
Getting a phone number is a MUST for lead follow-up success. The lead details & custom questions section is extremely customizable based on the information that is most important to your business. LinkedIn gives you the option to select several frequently used fields, such as name, email, phone, etc., and the ability to create custom questions using multiple-choice or short answers.
- Take advantage of auto-fill
A great perk of LinkedIn forms is that the platform will automatically fill in anything known based on a user’s profile, creating a much more seamless experience for the user.
📍 Smith.ai Example
- At Smith.ai, I use different fields based on the type of campaign that I’m running. For example:
- If I’m running a higher-funnel content campaign — such as downloading an eBook or watching an on-demand webinar —I only ask for basic information such as name, email, and phone number.
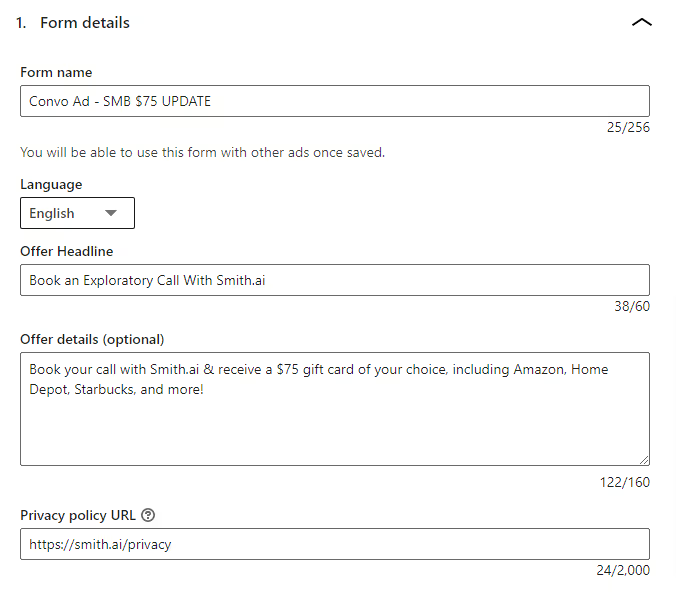
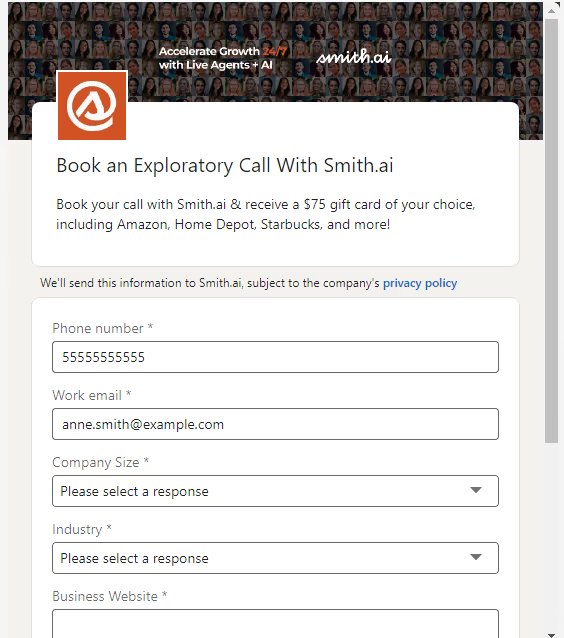
- If I’m running campaigns designed to be “higher quality” — such as encouraging a user to book an appointment or demo — I ask a few more questions, including job title, company name, industry, and website.
*Note: Your LinkedIn lead generation ad needs to capture the lead’s phone number for the Zapier workflow (described below) to work.
This is an example to show the process of form building:
Completion
This section is LinkedIn’s version of a “thank you” landing page after someone has submitted a form. The completion section is where I do most of my testing in terms of language and destination.
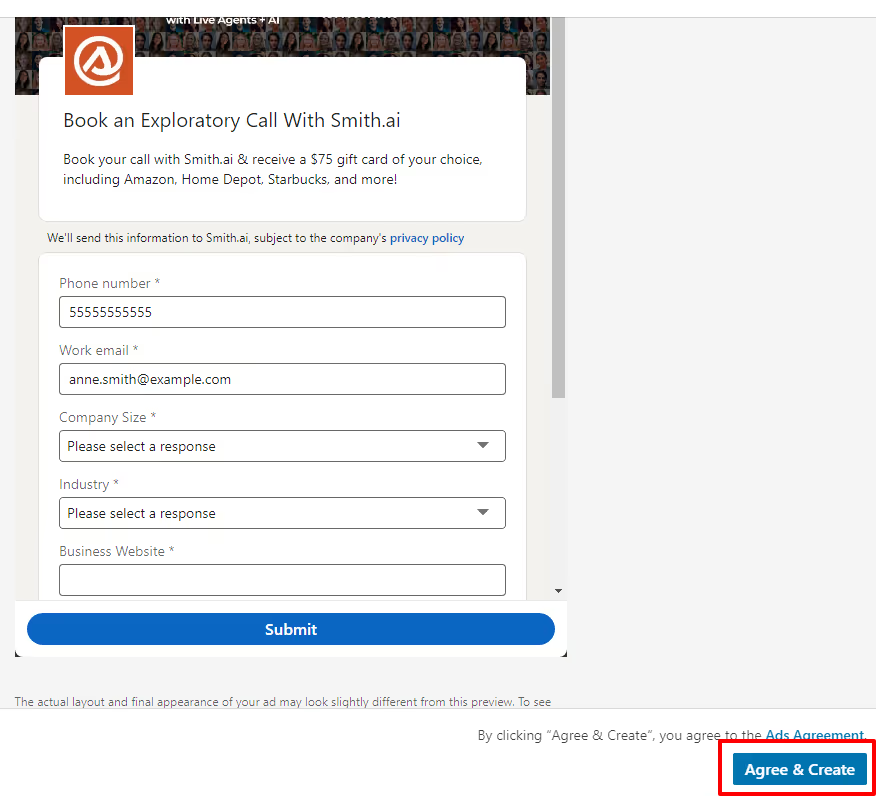
The options are short and sweet — you can include a thank you message (up to 300 characters) and the landing page URL you want to send people after completing the form. Once you’re happy with the message, click “Agree and Create” on the bottom right to create your form.

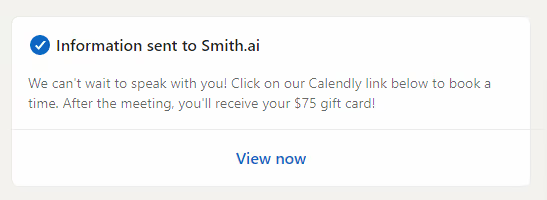
How you use the completion page will change based on the type of campaign you’re running. Here are some real-life examples:
Example #1: If someone has provided their information in exchange for a resource, such as an eBook, this is the spot to provide a link to download or view that resource.
Example #2: In cases where someone has provided their information to “learn more,” this is where to encourage them to book an appointment directly.
📍 Smith.ai Example
- Our forms were originally set up so that the “thank you” page language gave the user the option to book an appointment with our team on the spot, but also assured them that I would follow up if they chose not to. Given that booking appointments are a large objective for us, I changed the language to read “Get $100 off your first month of service when you book a free consultation with our team.” Month over month, our booking % rose from 21% to 33%.
⭐ Pro Tip
- Remember that your forms are a key part of your campaign, which will require testing and optimization. Test every element from the number of fields you have to the language and call to action (CTA) on the “thank you” page.
Once you have fully built your form, click “Agree & Create” in the bottom right, which will take you back to the section where you create your ad.
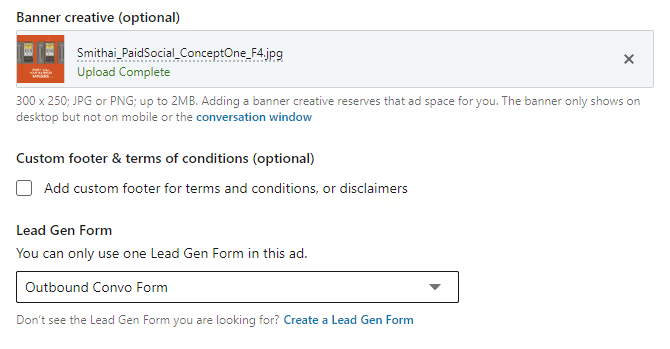
Step #3: Build your ad
This time, when you see the above messaging at the beginning of the ad creation process, you will select your form and upload a banner creative to be associated with the form.
Now, all that’s left to do is craft your user experience, keeping in mind a simple “if/then” rule of thumb. Every ad will have to start the same, but then the user experience will change based on the response that the user gives. Here is an example:
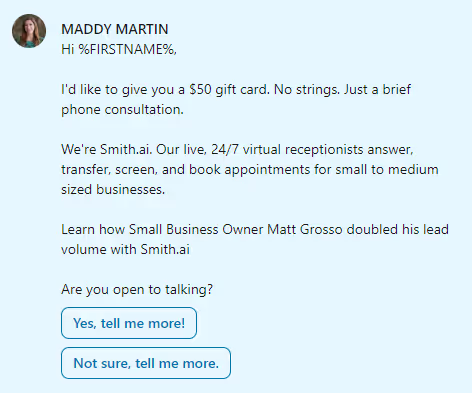
From there, I inform the user in different ways based on their initial response and level of openness to talking. Eventually, I will either disqualify the user through them saying “I’m not interested,” or “this can’t help me,” or I’ll get them to book a call, taking them to the form that I had set up earlier in the process.
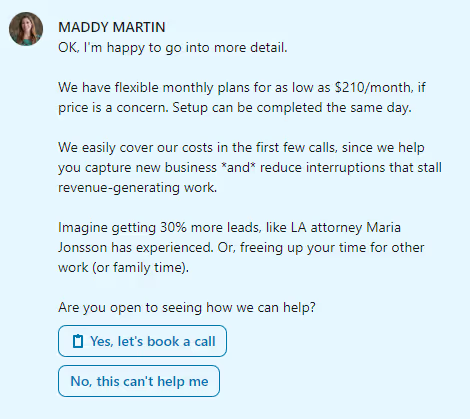
The user experience can be as long or short, straightforward or complex as you would like. As always, I recommend testing as much as possible, both with varying opening messages, degrees of personalization, and length of experience.
Setting up a Zapier automation
So you’ve created a LinkedIn account, started running ads, and are seeing the leads come in. That’s great! So, the hard part’s over, right?
Wrong.
Now you have to bridge the gap between you and your potential customers by engaging with them directly and encouraging them to make a purchase, which is arguably the most challenging part. This is where most businesses fail to achieve positive ROI from their ads! What happens after the lead comes in matters just as much as getting the lead in the first place.
You have two options:
Option #1: DIY
You could engage and nurture leads yourself, however, this requires you to be ready at a moment’s notice to capture them whenever they come in, day or night. And if sales and marketing isn’t your expertise, you might not be able to engage leads as effectively as you’d like.
Option #2: Hire a dedicated sales team
You could carve out your budget to hire an expensive dedicated sales team to engage leads for you, but beware of their limitations. For example, can they capture leads 24/7? Can they book appointments directly on your calendar or send custom follow-up messages? Can they qualify leads?
These options don’t exactly put your business in a great position to consistently and effectively engage leads. Among other downsides, these options tend to be financially and mentally demanding, time-consuming, and inflexible. So if neither of these options sounds all that appealing to you, you’re in luck.
There is a third option that can simplify and optimize your lead process. Moreover, this option allows you to remain well within budget and as hands-off as you’d like.
Drum roll, please…
Option #3: Use automation & outsourcing
Let automation software and sales outsourcing do most of the hard work for you. Then, you’ll have everything you need, from sales experts to leading tech, to capture and engage leads the right way, all for a fraction of the cost.
Let’s break down how exactly this works. Zapier’s automation software and Smith.ai’s outsourced sales teams work in tandem to give your sales process the best support possible. Zapier automatically sends your LinkedIn leads to Smith.ai, who can thoroughly engage, qualify, and nurture your leads. And with results-driven automation software and outsourced sales teams doing a majority of the heavy lifting in your sales process, your business can:
- Increase your speed-to-lead
- Improve your lead conversion rates
- Amplify incoming qualified prospects
- Boost your overall responsiveness
- Supplement your internal efforts
- Foster stronger connections
- Simplify your team’s workload
- Promote higher levels of productivity
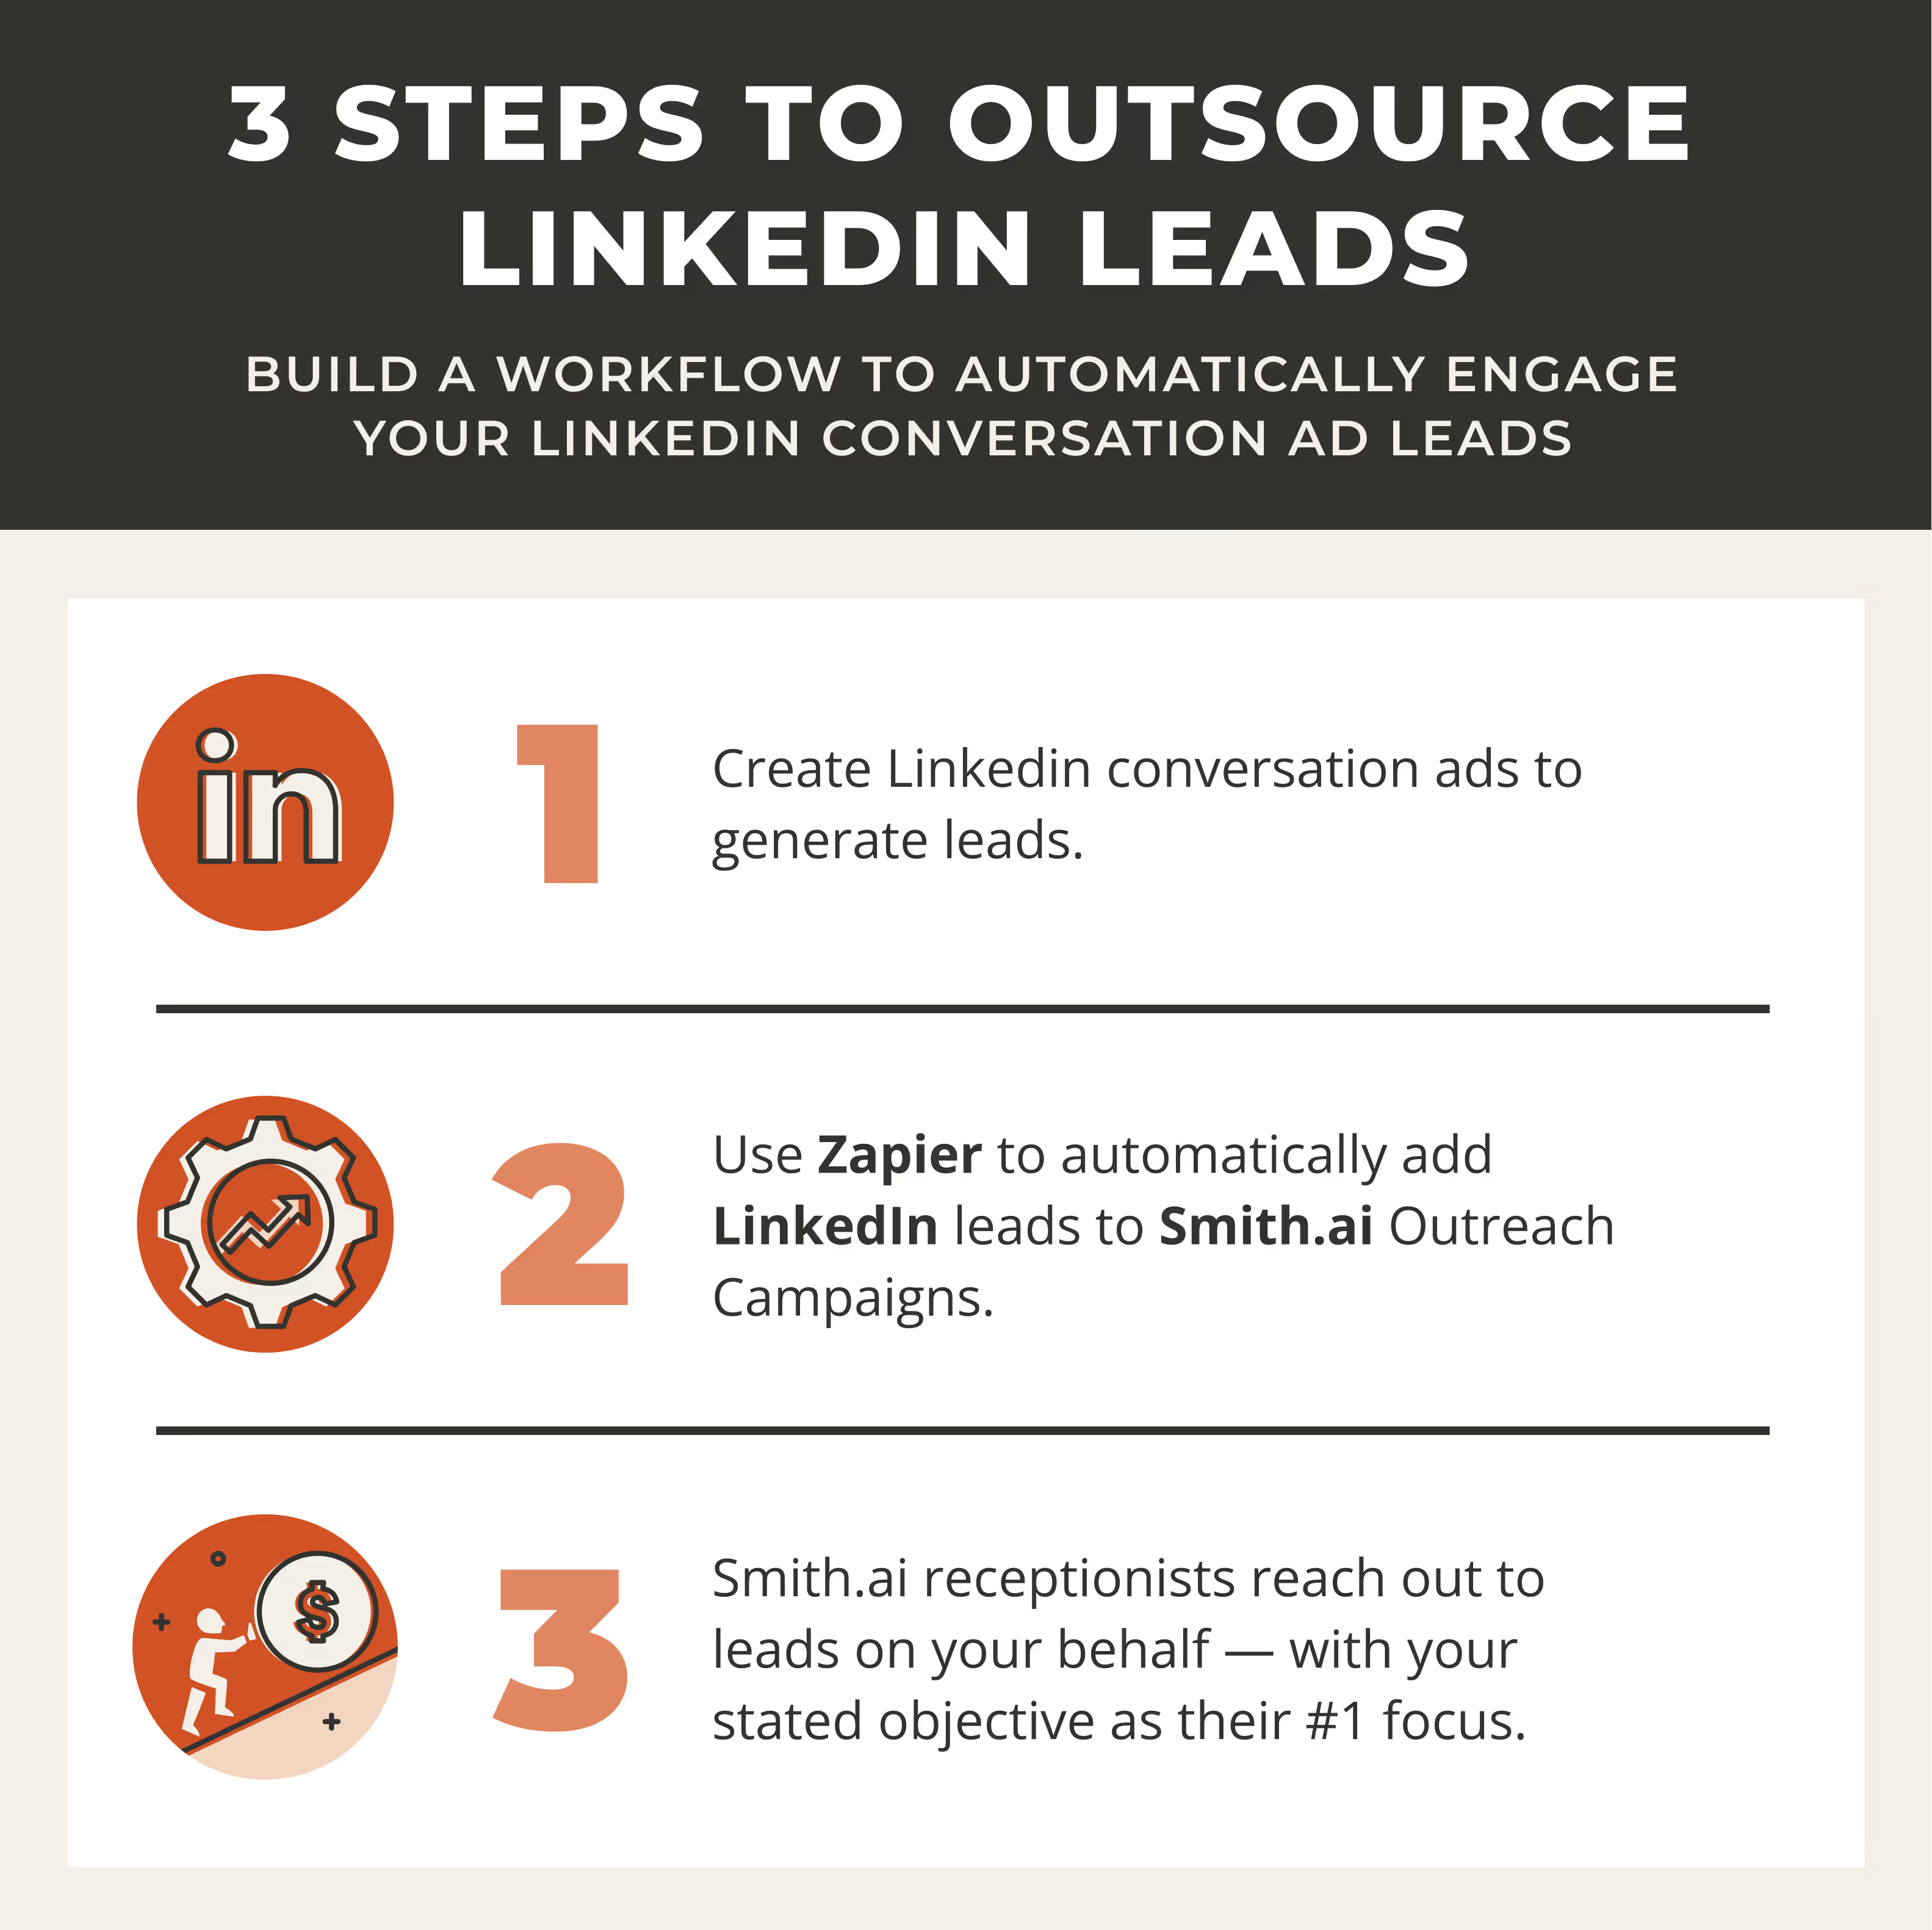
Interested in setting a workflow to automatically engage with your LinkedIn ad leads? Simple: Just follow these easy steps:
- Sign up for a Zapier Account
- Connect your apps to Zapier
- Set up the Zap trigger
- Set up the Zap action
- (EASY) Create a Zap to connect LinkedIn with Smith.ai
- (ADVANCED) Creating a Zap to connect LinkedIn with Smith.ai, Salesforce, and Slack
Signing up for a Zapier account
Zapier is widely considered the absolute best no-code automation solution in the business, so if you want to start automatically capturing leads that trickle in from your LinkedIn lead gen form ads, you’ll need to sign up for a Zapier account. You can sign up for one here. If you already have one, feel free to move on to the next step.
*Note: You can create a single-step Zap between some apps and Smith.ai on a free Zapier account. However, LinkedIn Lead Gen Forms is a premium app and requires a paid Zapier account.
Connecting your apps to Zapier
Once you’ve set up your Zapier account, you’ll want to connect it to your LinkedIn lead gen forms, CRM, and Smith.ai accounts. You can also connect your Zapier account to your Slack account, but this is optional.
❓ How To
- Navigate to your Zapier Dashboard.
*Note: If you’re not logged in, you will be prompted to do so. - In the Zapier Dashboard, click on My Apps.
- Click Add Connection
- Search for LinkedIn Lead Gen Forms
- Add additional connections for Smith.ai, Slack (optional), Calendly, and your CRM (in this guide, I’m using Salesforce) using the same steps above.
*Note: You may have multiple API Keys for Smith.ai and will need to use different ones for outbound Virtual Receptionist calls and Outreach Campaign calls, depending on which service you choose to use.
📚 Related Reading:
Creating a Zap to outsource to Smith.ai
Now that you’ve added your apps to Zapier, it’s time to build the connections between the different apps. I’ll start by building a Zap.
A little background information on Zaps: A Zap is what gets the ball rolling after a certain event has happened. These events are known as a trigger. Once a Zap senses a trigger event, it’ll go through the steps you’ve told it to go through, whatever that may be. Those steps are known as an action.
For instance, in the example I’m using, the Zap would look like this:
Trigger: A new LinkedIn lead gen form response comes in
↓
Action: Initiate an outreach campaign call from Smith.ai
This series of events will occur each time a new Linkedin response comes in.
Setting up the Zap trigger
Once you’ve created a Zap, you can move on to creating your Zap trigger. This trigger will initiate a desired action, which in this case will be Smith.ai reaching out and nurturing your new leads.
❓ How To
To connect LinkedIn lead gen forms and Smith.ai’s Outreach Campaigns, use this Zapier template:
From here, you have the option to either keep your LinkedIn only connected to Smith.ai or connect it to Salesforce and Slack as well. One option is far simpler than the other to set up, but we’ll go over both, starting with the easiest.
(EASY) Creating a Zap to connect LinkedIn with Smith.ai
❓ How To
- Choose your LinkedIn Lead Gen Forms account and click continue.
- Set up the Zap trigger by selecting the account and lead form.
*Note: Remember, the form MUST have the following fields: Name, Phone Number, and email (optional). - Test your trigger. It should display recent leads.
Setting up the Zap action
Once the trigger is in place, you’ll want to set up the Zap action.
❓ How To
1. The template has already chosen Smith.ai and the Call Someone (Outreach Campaign Only) action event, so verify and press Continue.
2. Choose the Smith.ai account that you connected to earlier and press Continue.
3. Connect the Smith.ai fields to the fields on your Linkedin ad.
You can find your Campaign ID by going to https://app.smith.ai/vr/campaigns/, selecting the correct campaign, then copying it from the URL, like so:
⭐ Pro Tip:
Zapier will let you save your Zap without renaming it, causing you to have lots of Zaps named “Name your zap.” Name your Zap something unique and informational so you can find it easily.
4. Activate your Zap by publishing it!
(ADVANCED) Creating a Zap to connect LinkedIn with Smith.ai, Salesforce, and Slack
You could break your Zapier connections into separate Zaps, but we prefer to have one large Zap that connects everything.
To give you an idea of what this looks like, here are the steps a Zap that connects everything should have:
- Trigger: New lead in LinkedIn lead gen forms
- Action: Check to ensure the lead is not in Salesforce (or your CRM).
- Filter: Only continue if the lead is not in Salesforce (or your CRM).
- Action: Find or create Salesforce Lead in Salesforce using the LinkedIn lead Info
- Action: Find the previously created Salesforce record
- Action: Initiate an outbound call from Smith.ai
- Action: Send a message in Slack
Optimize more than just your sales with Smith.ai
Of course, you can leverage Smith.ai’s live agents to optimize your sales follow-up, but why stop there when you can use our services to optimize many other aspects of your business?
On top of making outbound sales calls on your behalf and providing support for your outreach campaigns, Smith.ai’s virtual receptionists can answer calls, pre-screen potential clients, schedule appointments, take payments, complete intake forms, deliver essential performance insights, and so much more.
Plus, with Smith.ai’s Zapier integration, you can automate just about anything, from business communications, like texts, emails, and chats, to marketing operations, like social media campaigns, client data collection, and customer feedback surveys.
Let Smith.ai do the work for you, so you can not only run more impactful marketing campaigns, but a more responsive business overall.
Book a free consultation
Learn more about Smith.ai and how we can help your business thrive. Give us a call at (650) 727-6484, email us at hello@smith.ai, or instantly book a 30-minute consultation.
Take the faster path to growth. Get Smith.ai today.
Key Areas to Explore

Your submission has been received!


.svg)


