Take the faster path to growth. Get Smith.ai today.
Affordable plans for every budget.


It’s 2021 and today’s consumers are social—as many as 65% of today’s audience reports preferring social media as a means to contact a business. Fortunately, tools like Facebook Chat are making that easier than ever to do.
In this guide, we’ll cover everything that you need to know about adding Facebook Chat to your Shopify-based website, including what steps to take to ensure that it syncs all of your messages across the various devices and platforms. First, though, let’s talk a little more about the way social media is changing customer service and what brands can do to stay on track.
Facebook is a place where people go to connect—they expect to find brands there that are ready to connect, too. If you’re not, you’re already behind the eight ball. With more than 4 billion users globally, Facebook is one place where you definitely want to make sure that you are giving your audience the tools that they need to reach you.
Using social media to connect with your customers gives you the chance to provide a familiar communication tool that people know how to use and prefer to other forms of communication. It also allows you to ramp up your marketing efforts and your customer support solutions by embracing social media as just another arm of your business presence online.
Now that Facebook Chat is its own plugin and Messenger has a separate app, customers love brands that integrate Facebook directly on their website, citing a more personal connection and a dedicated resolution that they feel they don’t get on other platforms.
Shopify is quickly becoming one of the leading eCommerce platforms as it offers a simple, effective way for brands to set up their operations and get going without a lot of work. Now that it’s combined with the power of Facebook Chat, it doesn’t get much more streamlined than this.
And now that you understand a little more about why it matters, let’s talk about how you can get set up to communicate with your customers in their preferred medium.

The Facebook Chat plugin is an open-source solution that has been contributed to by Shopify and Facebook alike, although the latter has done most of the work. There's even a rich developer community that offers support and resources for people who are implementing this tool on their website. The basic installation process for Shopify requires a Facebook Page and a simple line of JavaScript code. If you’ve got that, you’re ready to get started.
When you follow the instructions and add the code to your Shopify site, you’ll be able to populate a messenger chat icon right in the lower portion of your screen so that people can reach out to you via Facebook Chat at anytime, right from your website. This is how the setup looks:

This plugin can be used on all types of browsers, including desktop and mobile. It does not work on Internet Explorer or in-app browsers in the Messenger platform. Other than that, though, people will be able to contact you at any time, from anywhere, ensuring that you never miss a beat. Plus, your communications will be synced and streamlined to ensure that everything gets handled and the conversation doesn’t get lost in translation.
The initial installation setup is fairly standard, regardless of your website host. Facebook offers a set of instructions to get the process done on their own help page, but we’ll cover it all here to make sure that you have everything that you need to know. Here are the steps.
1. Login to your Facebook business page
2. Navigate to the “Settings” and then find “Messaging”
3. Click “Add Messenger to Your Website” and then “Get Started”
4. Follow the setup instructions under “Set Up Your Chat Plugin”
5. Choose your language, add your website domain, and copy the code you’ll need
6. Go to the “Start the Conversation” and “Customize” sections and customize your choices for the integration
Once you’ve done this, you can click “Save” so that the settings are saved and the chat plugin is activated. Then, you’ll move on to your Shopify site and integrating there. In the settings, you’ll be able to create automated responses, set up your welcome message, and even choose your FAQs and away messages. The other custom settings allow you to change colors, alignment, and more.
The caveat, and a warning: Although the option is there, don’t move the location of the chat icon from the bottom right corner of the screen. This is where people expect to find the option and that’s where you should leave it for best results.
Now that your Facebook account is ready to go, you can set up your Shopify site to take the integration. Facebook has instructions on this too, as does Shopify:
Now, customers will be able to message you directly from your Shopify site and all the messages will show in your inbox in your Business Page.
Shopify is one of the more detailed integrations because you have to get more into the code than you might with a copy/paste editing tool. However, Shopify still makes it fairly simple, and help is available if and when you need it.
For those who do want the advanced features, there is a Facebook for Developers page with all the in-depth coding information and details. You can customize every last detail and attribute here with the various settings and tools. Most of our audience isn’t looking for this kind of detailed integration, but we’ll cover the basic details here so that you have the main features covered if you need them.
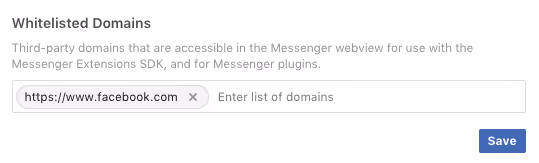
The first thing that you’ll need to make sure is that your domain is safelisted. This can be done programmatically, or you can do it in the page settings under “Advanced Messaging”. You’ll be able to add your site so that the Chat feature works. It looks like this:
The other option is to add the code to your website by just grabbing it and working it into your HTML. It’s a pretty simple thing, and it’s basically the same as doing it through the Facebook Settings. The code that you need will look like this:
<div class=”fb-customerchat”
Page_id=”<PAGE_ID>”>
</div>
One thing we Don’t Recommend: Changing the position of the app. The setting is there and you can technically put the chat integration wherever you want, but your customers will be looking for it in the corner. Leave it there, even if you customize every last detail from the developer page.
There’s a lot more that you can do here, including custom attributes, but you should only mess with them if you’ve got the developer skills. To get the full details, checkout the Facebook for Developers page: Facebook Chat Plugin.
In addition to providing a messaging platform, the Facebook Chat tool also allows you to share information with rich media so that you can get the message across perfectly. The supported features and actions include things like:
You can also see all of your messages right in your inbox, as well as on your Messenger app platform. You can even check the analytics for your account and see how Messenger and the Facebook Chat integration is working for your business. You’ll find that under the “Insights” button on your Facebook page.
In 2020, Facebook finally rolled out a Guest Mode feature that allows users to connect with brands on the Facebook Chat tool without having to have an account in the first place. Guests are now given a temporary account that they can use to send and receive messages on websites that use the Facebook Chat plugin. They can access the chats for up to 24 hours or until they terminate the discussion.
The best part? Your business can retain the conversation for as long as you’d like. There is also the option for visitors to transition into a logged in account during the conversation. They can choose to do this manually, or they will be prompted if they:
Essentially, guest mode guarantees that every single customer or lead can contact your brand quickly, and in a familiar way. Plus, the new feature to transition to an account later lets people get the conversation started without having to provide more information than necessary, getting their answers sooner and increasing trust and brand loyalty.
Guest mode is just one of the reasons that Facebook Chat is going to increase the business coming through your support channels. However, you’ll find that this is a good thing for your business, even if it makes you feel like you’re going to be too busy to handle it all.
Your business has enough to do without one more customer service tool, but can you really forego the 24/7, real-time response that today’s customers demand? Absolutely not. That’s where a partnership with Smith.ai can provide dedicated agents to handle live chats.
Smith.ai offers a comprehensive live chat solution that takes care of website chat. Plus, we include the software you need with a team of 24/7 agents for round-the-clock live-answering coverage that’s available in English and Spanish. We’ll take every conversation on your behalf and we’ll work with your website and tech tools seamlessly.
We can handle any customer need, from simple questions and answers to appointment scheduling, client intake and screening, payments, and so much more. Ask how our team can act as the face of your brand to improve your customer service solutions for good. We can even work with you to create a strategy to handle your communication needs that meets your business needs and still fits your budget.
Learn more by scheduling a consultation to discuss our 24/7 live chat services, as well as how we can take your communications to the next level. You can also reach us at hello@smith.ai or by calling (650) 727-6484.
.avif)
Sean Lund-Brown is a current Marketing Assistant for Smith.ai. A graduate from Metropolitan State University of Denver, Sean graduated with a BA in Music and an individualized degree in Teaching Vocal Pedagogy.


