Take the faster path to growth. Get Smith.ai today.
Affordable plans for every budget.

If you're considering Smith.ai or an existing customer, you're someone who cares about productivity and making the most of your time. You know little things add up to be big annoyances. And one of those for anyone who works off a MacBook with an external keyboard is losing Touch ID and having to enter your password all the time.
Touch ID on your MacBook lets you quickly unlock your Mac, make purchases, authenticate system dialogs, and more. But it doesn't work when your Mac is closed and you're using an external display and keyboard. But in just a few steps with a Yubikey, you can be back to one-tap authentication. Yes, there is a solution for adding fingerprint login to your Mac!
This is for anyone who:
In this short tutorial, we'll show you what hardware to get, and how to set it up.
A Yubikey is term for one of five models of usb password-generating and authentication devices made by Yubico. They are the industry standard for hardware Two-Factor Authentication/2FA. (When I was at Google, they actually had candy jars full of them on counters because of how many we'd need.) So, first figure out what kind of port you'll be plugging your Yubikey in to. It should be something near your keyboard, or the keyboard itself, and connected to your computer. This could be a keyboard with USB ports on the back, a display with USB ports on the side, or a USB hub that you attach to your closed laptop, for example.
(We're linking to the manufacturer's website but you can find them elsewhere, too.)
Once you have it, let's continue. And we should note, these instructions are for a brand new Yubikey — we are not responsible for any crisis caused by overwriting configuration on an existing one!
First, download the YubiKey personalization tool, here. Then follow the instructions in this video to configure it with your system password.
Please open a text editor and verify that it's working. To do this, hold your finger on the Yubikey for 3-4 seconds and it should type out your password. If it doesn't, please repeat these steps:
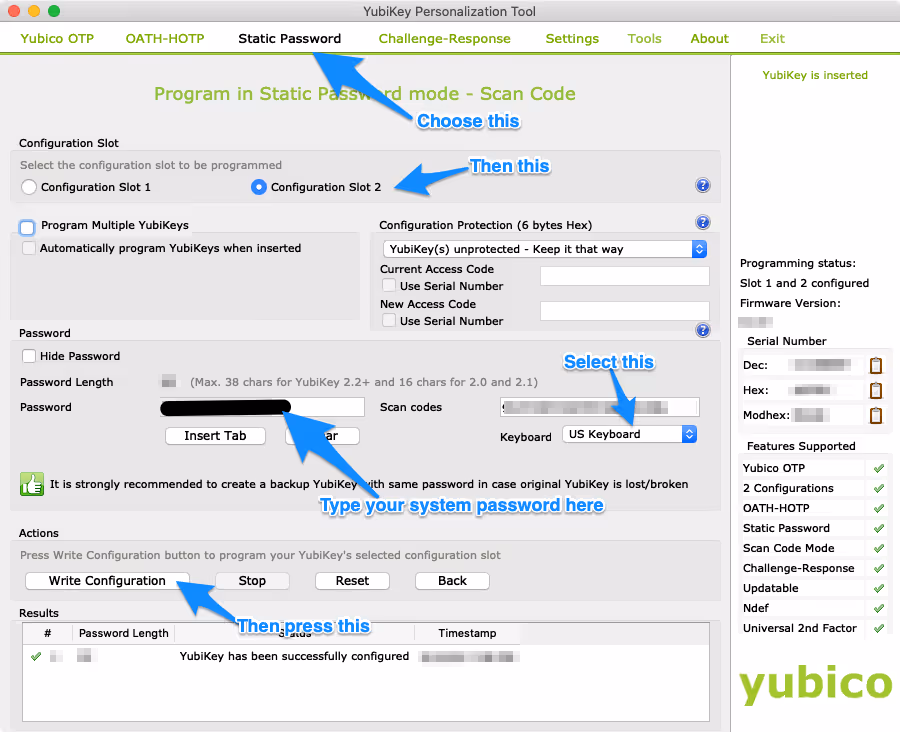
Now try it again in the text editor. It should work.
Your Yubikey has two "slots" to generate passwords. It comes from the factory with Slot 1 programmed for Yubico OTP (One-Time Password) on just a tap. We want that "tap" but we don't need to lose the Yubico OTP. So, we'll now swap those slots.
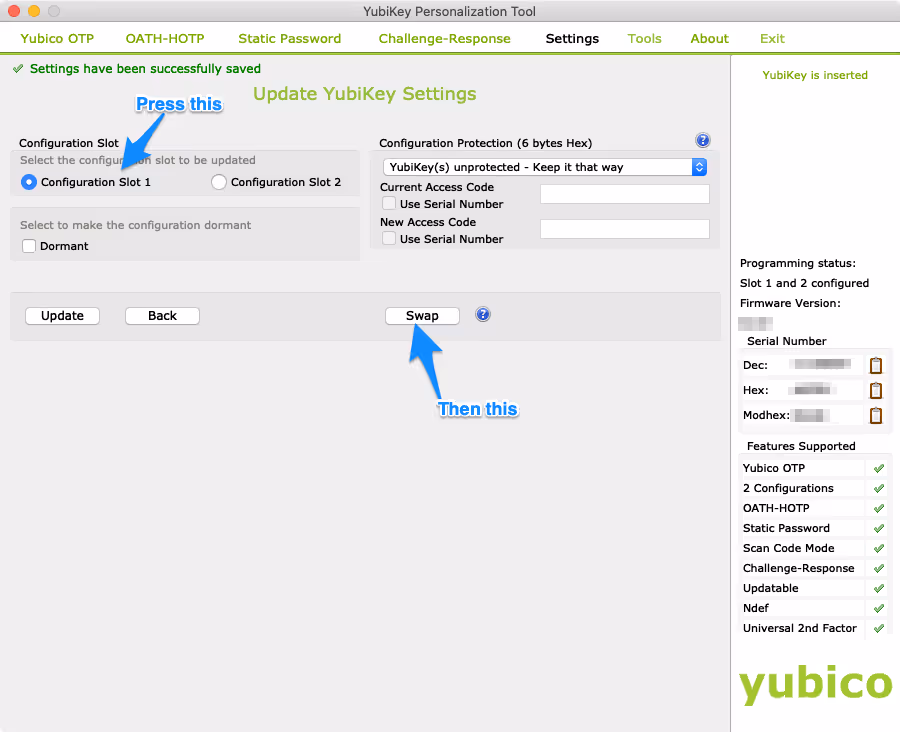
You've now swapped the Yubico OTP to long-press (Slot 2), and your system password to just a tap, via Slot 1. Test that out in your text editor to verify it.
That's it. Congratulations. You can now enter your system password with just a tap on Mac OS X. Whether you never had a Mac with Touch ID at all, or you have one but it's closed when it's in use on your desk, you now can deal with the 20 password dialogs per day with ease.
Ok, this is important: What you're doing is a major security risk. With TouchID, your finger is your password, and your finger goes with you. Therefore, don't leave your Yubikey plugged in when you are not around, don't leave it in any accessible places, and so on. Anyone who has access to it could have access to your private information by unlocking your computer.
What you do with Slot 2, the long-press, is up to you. If you use 1Password, our favorite password manager at Smith.ai, you may want to use a separate password for 1Password for security purposes and configure your Yubikey with that password. You can also use it as your main 2FA Authentication generator, a hardware authentication for a specific service or app, and more.

An experienced member in the tech industry, Justin Maxwell is now the co-founder & chief design officer at Smith.ai.


.svg)
